Diabetes and Your Child: Giving Insulin Injections
The digestive system breaks down food, resulting in a sugar called glucose. Some of this glucose is stored in the liver. But most of it enters the bloodstream and travels to the cells to be used as fuel. Glucose needs the help of the hormone insulin to enter the cells. Insulin is made in the pancreas, an organ in the belly (abdomen). The insulin is released into the bloodstream in response to the presence of glucose in the blood.
Think of insulin as a key. When insulin reaches a cell, it attaches to the cell wall. This signals the cell to create an opening that allows glucose to enter the cell. Without insulin, your child's cells can’t get glucose to burn for energy. This is why they may feel weak or tired.
The insulin your child is missing can be replaced with shots of insulin (injections). Some children also use insulin pumps. Then your child's body can burn glucose for energy. This helps keep your child's blood sugar within a healthy range.
At first, injecting insulin may seem scary for both you and your child. But you will have help from your child's healthcare provider, nurse, or diabetes educator. They will teach you how to give your child insulin injections. If your child is older, they can learn how to inject insulin. If so, you will still have to check the amount of insulin your child injects each time.
Types of insulin
There are many types of insulin. Here are types your child will most likely use:
-
Fast-acting insulin. Fast-acting insulin must be taken with meals. Give it to your child within 15 minutes before your child eats.
-
Regular or short-acting insulin. Short-acting insulin is also usually taken before a meal. It will usually reach the bloodstream within 30 minutes after injection.
-
Intermediate-acting insulin. Intermediate-acting insulin takes longer to start working than fast-acting insulin. But it stays in your child’s bloodstream longer.
-
Long-acting insulin. Long-acting insulin is in your child’s bloodstream at all times. It helps keep their blood sugar levels within target range for long periods.
Your child's healthcare provider will prescribe the type or types of insulin that best fit your child's needs.
Choosing the injection site
How fast insulin starts working depends on the type of insulin and where you inject it. Insulin is injected into the fat just below the skin. It works quickest when injected into the belly. Other injection sites include the back part of the upper arms, the buttocks, and the top and outer sides of the thighs. Other things to keep in mind when choosing the injection site include:
-
Change the injection site each time to prevent problems.
-
Allow about 1 inch between injection sites.
-
Don’t inject in the area 2 inches around the belly button.
Ask your child's healthcare provider to teach you how to correctly rotate the injection site and how to stay away from areas of lipohypertrophy. This is a bump under the skin caused by injecting insulin in the same spot multiple times. Also ask about the correct insulin injection technique and how to prevent injecting insulin into the muscle. Accidentally injecting into the muscle or into an area of lipohypertrophy can affect how insulin is absorbed.
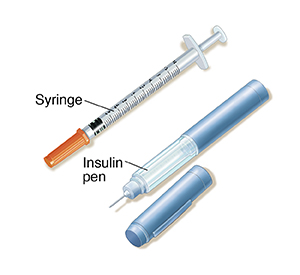
Using a syringe
Always test your child’s blood sugar before injecting insulin. Blood sugar readings help you decide how much insulin to give. Be sure to inject it into the fat just under the skin. Follow these steps for using a syringe:
Step 1. Getting ready
-
Gather your supplies. You’ll need:
-
Wash your hands. Use soap and warm water.
-
Wipe the rubber top (stopper) of the insulin bottle (vial) with an alcohol wipe.
-
Prepare the insulin. If your child uses cloudy-type insulin, roll the bottle gently between your hands about 20 times. Don't shake the insulin. And don't use cold insulin. Instead, keep 1 bottle at room temperature and store the rest in the refrigerator.
Step 2. Preparing the syringe
These steps will take some practice:
-
Remove the syringe from its package.
-
Take the cap off the needle.
-
Draw air into the syringe. Pull back the plunger to draw air into the syringe. Pull the plunger back to the mark (line) for the number of units of insulin you want to inject. The mark on the syringe barrel nearest the needle is 0 (not 1).
-
Inject air into the insulin bottle. Hold the bottle on a flat surface with one hand. With your other hand, hold the syringe straight up and down. Slowly push in the plunger to inject air into the insulin.
-
Turn the syringe and bottle upside down. Keep the needle in the stopper. Flip the syringe and bottle so that the bottle is now on top and the syringe is on the bottom. Be careful not to bend the needle when tipping the insulin bottle.
-
Draw insulin into the syringe. Keep the tip of the needle below the level of insulin. You may need to pull the needle out slightly. Slowly pull back the plunger to draw out the insulin.
-
Check for air bubbles. Gently tap the syringe while the needle is still in the stopper. The air bubbles will move to the top of the syringe. Push the plunger in a tiny bit to release the air bubbles back into the insulin bottle. Your child's healthcare provider, nurse, or diabetes educator may show you other ways to remove air bubbles.
-
Remove the needle from the insulin bottle.
Step 3. Giving the injection
-
Clean the injection site. Use an alcohol wipe to clean the area where you’re going to inject. Allow the area to air-dry. If the skin is wet with alcohol the injection will sting.
-
Pinch an inch of skin. Pull up about 1 inch of skin. Pinch the skin gently. Don’t squeeze it. This is to prevent injecting into muscle.
-
Insert the needle. Insert the needle into the skin at the angle you were shown.
-
Inject the insulin. Slowly push in the plunger until the syringe is empty.
Step 4. Removing the needle
-
Count to 5. Then remove the needle.
-
Watch the injection site for leaking insulin and bleeding. If the site bleeds, dab it with a cotton ball or tissue. If insulin leaks, ask your child’s healthcare provider, nurse, or diabetes educator to make sure you are doing it correctly.
Step 5. After the injection
Medicine that comes in a container for a single dose should be used only 1 time
Using an insulin pen
An insulin pen may be used to inject insulin. They make it easy to give injections. Insulin pens hold insulin in cartridges. A new needle is used for each injection. There are different kinds of insulin pens. Talk with your child’s healthcare provider about what is best for your child.
Tips for pen use
-
Wash your hands with soap and water before you begin.
-
Clean the injection site with an alcohol wipe.
-
Use a new needle each time.
-
There are different types of pen needles. Know what type you are using and how to use it.
-
Standard pen needle: This needle often has a removable outer and inner cover. Both covers need to be removed before the injection.
-
Safety pen needle: This needle has a removable outer cover. The inner cover is a fixed safety shield that is not removed. Instead, the shield will be pushed back. This will expose the needle as the injector is pressed against the injection site.
-
When you get a new box of needles, always check to see what kind of needle it is. It might be different from what you are used to. If you are not sure how to use the new needles, talk with your healthcare provider.
-
Never leave the needle on the insulin pen when you’re not using it.
-
Before injecting, tap the needle with your fingertip to get rid of air bubbles.
-
Test the pen by dialing to 2 and pressing the injection button all the way. Insulin should come out of the needle when you do this. If not, check for air bubbles again.
-
Test again. If no insulin comes out after three tries, start over with a new needle.
-
An adult should check the dose that a child dials.
-
Push the button down all the way. Then count to 10 while injecting the insulin. Pens take longer than syringes to deliver insulin.
Smart pens, now called connected insulin pens (CIPs), are also available. These pens can be programed to calculate insulin doses. They can also send data to your smartphone.
Insulin pumps
If your child has had trouble controlling their blood sugar, they may be eligible to use an insulin pump. A pump delivers insulin throughout the day, with no need for multiple injections. The FDA has approved insulin pumps for children as young as age 2.
Storing insulin
-
Store unopened insulin in the refrigerator. An open bottle can be stored at room temperature, such as on the kitchen counter. But don’t let the insulin get too hot. Always keep it below 86°F (30°C). And never let it freeze!
-
Throw away expired insulin. This is true even if you haven't opened it.
-
Use insulin within 28 days of opening it. Write the date you opened it on the bottle.
-
Check that your child carries his or her insulin and injection supplies in bag made to protect it from heat and cold.
Overcoming fear of injections
Injections may be hard for both you and your child. But there are things you can do to make it easier. To calm your child’s fears:
-
Treat injections as normal and routine.
-
Ask about giving yourself a test injection with saline. That way you will know how an injection feels.
-
Praise your child for not delaying or making excuses. If your child needs to complain, give him or her time for that after the injection is over.
-
If your child is afraid of needles, ask his or her healthcare provider, nurse, or diabetes educator for help. For example, ask about devices that blocks your child's view of needles.
Your child’s role
As your child gets older, they may want to help with injections. Just make sure it is their decision. You can help your child by letting them:
-
Figure out how much insulin to use.
-
Choose the injection sites.
-
Draw insulin into the syringe. You should check the dose.
-
Push on the plunger to inject the insulin.
-
Practice injections on an orange.
To learn more
For more information about diabetes, visit these websites: